custom flex skins
as3 :: customize your components

creating web-applications with flex 3 is great. there are a ton of pre-made components, and an open-ended architecture to allow you to create your own. built into flex is also a variety of options to change the visual styles of the components. today i will talk about two different types of customization. first, the simplest method, is using css to style your components. next, the more advanced technique, is creating component skins. for this example i will be using flash cs3.
with in a flex mxml application, css is natively understood. so by utilizing the tags, we can create a variety of styles for an application. personally, i don't really care for the eclipse/flex built in css editor, but since flex uses valid css, any editor can work! macromedia has also created a very useful tool for helping designers/developers write flex 3 specific css. click here to view the flex 3 style explorer
now for some code...
like in all css there are two ways to define a style.
first as an overall style for one type of object, for instance...
Button {
   cornerRadius: 0;
   fillColors: #333333, #cccccc, #cccccc, #666666;
   color: #ffffff;
   borderColor: #ffffff;
}
this style will be applied to all buttons that appear in your application. notice the style name is simply "Button", the name of the component type. this is how flex understands which objects to apply the style to.
.anotherButton {
   cornerRadius: 0;
   fillColors: #ffffff, #333333, #333333, #666666;
   color: #ffffff;
   borderColor: #000000;
}
now, this code by default will not be applied to any components in your application. notice the style name is time is ".anotherButton", the period that prefaces the style name indicates that this is a custom style, not a component style definition. to apply this style to a button in your application use the following code...
<mx:Button styleName="anotherButton"/>
so with that in mind, here's a very simple flex 3 application using css styles.
<?xml version="1.0" encoding="utf-8"?>
<mx:Application xmlns:mx="http://www.adobe.com/2006/mxml" layout="absolute">
<mx:Style>
Application {
   backgroundColor: #000000;
   backgroundGradientColors: #666666, #cccccc;
   themeColor: #00ff00;
   color: #ffffff;
}
Panel {
   borderStyle: solid;
   borderColor: #cccccc;
   roundedBottomCorners: true;
   cornerRadius: 0;
   headerHeight: 18;
   backgroundColor: #666666;
   titleStyleName: "panelTitle";
}
.panelTitle {
   letterSpacing: 3;
   color: #ffffff;
   textAlign: center;
   fontFamily: Verdana;
   fontSize: 12;
}
TextInput {
   borderStyle: solid;
   borderColor: #ffffff;
   borderThickness: 1;
   cornerRadius: 0;
   backgroundColor: #333333;
   color: #ffffff;
   textAlign: center;
   fontFamily: Verdana;
   fontSize: 12;
}
Button {
   cornerRadius: 0;
   fillColors: #333333, #999999, #ffffff, #333333;
   color: #ffffff;
   textRollOverColor: #ffffff;
   textSelectedColor: #ffffff;
   borderColor: #333333;
}
.anotherButton {
   cornerRadius: 0;
   fillColors: #ffffff, #666666, #333333, #999999;
   color: #ffffff;
   textRollOverColor: #ffffff;
   textSelectedColor: #ffffff;
   borderColor: #333333;
}
</mx:Style>
	<mx:Panel styleName="" width="244" height="134" layout="absolute" horizontalCenter="-1" verticalCenter="9" title="here's a panel">
	<mx:Label x="0" y="10" text="Label"/>
	<mx:TextInput x="0" y="27" width="220" text="text input"/>
	<mx:Button x="0" y="57" label="Button"/>
	<mx:Button styleName="anotherButton" x="78" y="57" label="Button"/>
	<mx:Button x="155" y="57" label="Button"/>
	</mx:Panel>
</mx:Application>
skinning is the technique of images and/or movieclips to create a visual style for a flex component. being that adobe makes a dozen different applications, there are in fact a dozen different ways to create flex skins. here's a really nice article over viewing the different ways to skin flex
and here's another great article
today in going to discuss creating skins in flash. adobe makes it really easy for us by providing a set of pre-made flex skin templates. go a head and download them from here:
Your looking for the "Flex Skin Design Extension for Flash"
the files
the documentation
(*note* you will need an adobe ID -- they are free btw...)
there are also a set of component classes for creating completely custom, skinnable flex compatible components called "the flex component kit for flash cs3". but im not gonna dive into all that just yet... ;D
now that you have download the "flex3skins-flash.mxp" file, you need to register it with the adobe extension manager. (this should be installed already if you have any cs3 product, but if not grab a copy here) just double click on the file, or open the extension manager and click "File... Install Extension"
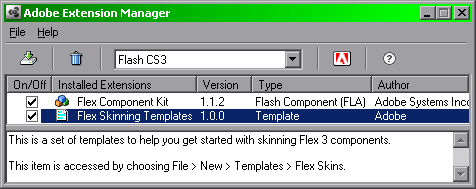
after agreeing to the disclaimer, you should see an alert box telling you that your templates have been successfully installed. now we're ready to make some flex skins!
open flash cs3.
select "File... New", then click the "templates" tab on the top left. change the category to "Flex Skins", and now you can see a list of all the available flex component templates. now just to let you know, there is not a template for EVERY available flex component, but the vast majority.
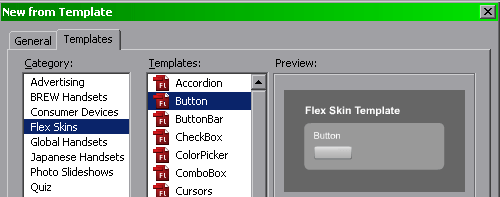
so go ahead and select the "button" template. when the flash file loads take a look at the library, you'll notice there's a movieclip called "button_skin". open it up and take a look at what's there.
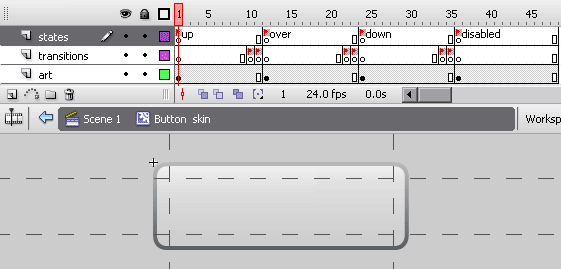
in the timeline, in the "states" layer, we have four separate keyframes, up, over, down, and disabled. these keyframes are the four main visual styles for the flex button component. now, take a look at the gridline down in the main design area. these lines are called a scale9grid (more info about that here) they show flex the areas that are allowed to scale, the default size, and the main area where the label is going to be placed. make a new layer in the timeline above "art" and add blank key frames that match the layer below. now add some images for each of the button states. then use the cursor tool to move the scale9grid lines to match up for your skin.
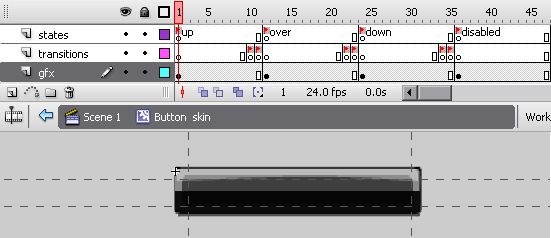
once you have all the images ready to go right click on the "button_skin" object in the library and click "linkage". this brings up the actionscript3 properties for that particular movieclip. give your visual style a name I used "blaqueButtonSkin". now take a look at the base class for this object. it need to be set to "mx.flash.UIMovieClip". the user interface movieclip class is setup to look for the names of the keyframes to decide which images to use for the different states of your skinned components. so make sure you keep the frame names set to "up, over, down, and disabled" or flex will not be able to parse your skin!
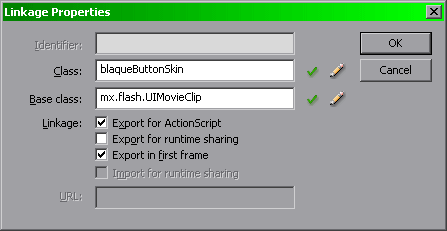
he last step in flash is to generate our skin library for flex. click "File... Publish Setting" (or ctrl+shift+f12) make sure your swf setting are set to actionscipt3, and the "Export .SWC" checkbox is checked. then publish your skin. take a look in the directory that flash published to. there should be a few files in there, but were only going to be concerned with the SWC file. copy that file to the clip board and open flex 3.
in flex start by creating a new MXML application. then right click on the /libs/ folder and paste in our skin.swc file. everything in the lib (or library) folder is automatically added into flex's available namespaces to be used in your application. switch into the source code tab and add a style tag to your application. then add the following css...
Button {
  skin: Embed(skinClass="blaqueButtonSkin");
  color: #ffffff;
  textRollOverColor: #ffffff;
  textSelectedColor: #ffffff;
  textAlign: left;
}
notice how the skin is applied to the button with the "skin" tag and we're using the linkage name we set in flash, blaqueButtonSkin. also by using the embed keyword in conjunction with the skinClass tag will attach your visual style completely, even during design time.
one thing to note is that some of the components are based on other ones. the for instance, its template file only contains the up and down arrows. the textbox that the actual selected number appears in is based on the regular flex component. so to skin both parts you will need to make a skin for the numericstepper as well as the textarea. but you can save both of those files into one swc by just copying and pasting the library object from one template into the library of another one.
